How can I display FPS and GPU percentage on the top right in Windows 11?
How can I display FPS and GPU percentage on the top right in Windows 11?
4 Answers
Monitoring your system’s performance while gaming or using demanding applications is crucial. Here are two effective methods to display your Frames Per Second (FPS) and GPU percentage directly within your game window.

Leverage the Built-in Windows Game Bar (Ideal for Simplicity):
Windows 10 and 11 include the Windows Game Bar, offering a convenient, first-party FPS counter.How to Enable & Position it Top-Right:
While in your game or application, press the keyboard shortcut Win + G.
The Game Bar overlay will appear. Click on the “Performance” widget (usually shows CPU, GPU, RAM, FPS).
Hover over the widget and click the “Pin” icon (looks like a pushpin) to keep it visible.
Click the widget title bar and drag it to your desired location on the screen – typically the top-right corner.
You can resize the widget using the drag handle in the bottom-right corner if needed.
Benefits: This native solution is lightweight (no extra software needed), easy to set up, and provides real-time FPS and GPU/RAM usage data. It’s an excellent hassle-free option for basic monitoring.
Utilize NVIDIA GeForce Experience (For NVIDIA GPU Owners):
If you have an NVIDIA graphics card, the GeForce Experience application includes a robust in-game overlay with an FPS counter and detailed GPU metrics.
How to Configure the Top-Right Overlay:
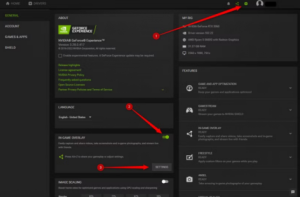
Open the NVIDIA GeForce Experience application.
Click the Settings (gear) icon in the top-right corner of the main window.
Under the “General” tab, ensure the “In-Game Overlay” toggle is switched ON.
Click the “Settings” button next to the “In-Game Overlay” toggle (or press Alt + Z while in-game and choose “Settings”).
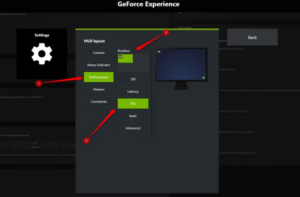
Navigate to HUD Layout > Performance.
Select the “FPS” option. This reveals placement controls.
Choose the top-right option from the four-position quadrant selector.(Optional) Within the same “Performance” menu, you can enable “Advanced” view to show detailed stats including GPU utilization (%), temperature, clock speeds, and more alongside the FPS counter.
Benefits: GeForce Experience offers a highly customizable overlay with comprehensive performance data beyond just FPS, specifically tailored for NVIDIA hardware. Positioning it top-right is straightforward.
Choosing Between Them: For a quick, built-in solution showing FPS and basic GPU/RAM, the Windows Game Bar is sufficient. For NVIDIA users seeking detailed GPU statistics (like exact GPU usage percentage) alongside FPS in a highly customizable overlay, GeForce Experience is the superior choice. Both methods allow reliable placement in corners like the top-right.
If you’re gaming on Windows 11 and want the scoop on how to showcase your FPS and GPU stats in the top right corner, you’ve got a couple of solid options: Xbox Game Bar or, if you’re rolling with a specific graphics card, their software might do the trick. Let’s dive in and see how this goes.
First up, Xbox Game Bar. This is the easy route. Just hit Win + G to bring up the overlay. You’ll want to hunt down the “Performance” widget — it’s lurking in the “Widgets” menu if it’s not staring you in the face. Once you’ve got that on your screen, pinning it is a must. Click that pin icon to make sure it sticks around while you’re smashing those buttons. Now for the fun part — you can tweak those settings to show FPS and GPU percentages. The default spot for this widget might not be to your liking (bottom left? No thanks!), so just give it a drag to where you want it — top right’s perfect, right? After you’ve finagled the setup, wave goodbye to Xbox Game Bar with Win + G or just click around outside the box.
Now for those with Nvidia cards, GeForce Experience is your buddy here. Search it up in your Start menu and jump into settings (look for that gear icon). You want “In-Game Overlay” turned on. Slam Alt + Z to pop up the overlay menu and fiddle around in the “HUD Layout”. Pick “FPS Counter” and slap it in the top right. If you’re itching for more details, GPU utilization is also a go from that same menu. Fire up your game, and voila, you’re in business!
AMD users, I haven’t forgotten you. You’ve got the Radeon Software to handle this. Right-click your desktop and there it is. Go to the “Performance” tab and dive into “Metrics” — make sure FPS and GPU options are live. Tweak the positioning, maybe do a little shuffle, to plant them in your favored spot on-screen. Game time means you’re set to see your stats shining brightly.
All said and done, any of these paths should serve you well on keeping tabs on your gaming metrics in Windows 11. Now, go knock yourself out and happy gaming!
Alright, if you want to keep an eye on your gaming performance in Windows 11, showing your FPS and GPU usage in the corner is a nifty trick. Let’s dive into how you can do this, starting with some built-in options.
1. Built-in Methods
A. Xbox Game Bar
You’ve got a handy tool right in Windows 11 for monitoring performance. Here’s the scoop:
- Turn it on: Head over to Settings, then Gaming, and flip the switch for Xbox Game Bar to “On.” If your FPS is AWOL, tap on “Request access” under the FPS tab and restart your PC. It should do the trick.
- Fire it up: When you’re playing a game or running an app, smack Win + G. A performance panel will pop up; pin it if you like it in the top-right.
- Tweak it: Move the panel where you want on-screen, maybe the top-right corner, and expand it to see everything from GPU usage to FPS.
B. NVIDIA/AMD Overlay (GPU Vendor Tools)
For those with dedicated GPUs, these overlays are gold:
- NVIDIA GeForce Experience: Hit Alt + R, go into Performance, and fiddle around in HUD Layout to shift the overlay.
- AMD Radeon Software: Navigate to Performance, toggle on Metrics, and place your overlay wherever suits you.
2. Third-Party Tools
A. MSI Afterburner + RivaTuner
If you’re up for a little setup, it’s a popular choice:
- Grab the combo of MSI Afterburner and RivaTuner Statistics Server.
- In MSI Afterburner, trot over to Settings and the Monitoring tab, then check boxes next to GPU usage and Framerate to display them onscreen.
- Set the overlay position to Top-Right in RivaTuner.
B. FPS Monitor
Another neat pick if you want more control over how things look:
- Download FPS Monitor from the official source, install it, and set up your widgets for FPS/GPU usage to hang out in the top-right corner.
3. Common Issues & Fixes
Let’s tackle a few hiccups you might run into:
A. Overlay Not Appearing
- Conflict: Turn off extra overlays from other tools that might be hogging space.
- Permissions: Make sure Xbox Game Bar is allowed to monitor games under Settings → Privacy & Security → Diagnostics & Feedback.
B. Incorrect Positioning
Sometimes things end up in the wrong spot:
- Reset positions within the tool you’re using or turn off Fullscreen Optimizations for your game (find this under game properties → Compatibility).
C. Missing GPU Metrics
Meta game stats not showing up?
- Update your GPU drivers. Seriously, it helps.
- If you’re rocking a mixed GPU setup, verify the High Privilege is enabled in RivaTuner.
4. Background & Optimization Tips
Why bother with FPS/GPU monitoring anyway? Well, catching performance issues and tweaking settings for smoother gameplay is worth the hassle. Here’s more on what’s good to know:
- Ideal FPS ranges: 60 is cool for casual gaming; go for 120+ if you’re chasing the competition vibes.
- GPU usage norms: A 90-100% GPU usage signals things are humming along; anything lower might scream CPU bottleneck or a bug.
Summary of Methods
| Method | Pros | Cons |
|---|---|---|
| Xbox Game Bar | Easy breezy, no install | Limited customization |
| MSI Afterburner | Customizable as heck | Bit of setup involved |
| GPU Vendor Tools | Tailored for specific GPUs | Might clash with other apps |
Bottom line? Most folks get by just fine with Xbox Game Bar or MSI Afterburner. Choose whichever suits your level of tech comfort and what you’re after.
Enjoy monitoring your FPS like a pro!
If you’re itching to see your FPS and GPU percentage up in the corner of your screen on Windows 11, don’t worry—I’ve got a couple of tricks up my sleeve for you. You can either go with the trusty Xbox Game Bar or give MSI Afterburner a whirl. Let’s dive in and chat about each option.
Now, first up is the Xbox Game Bar. It’s kinda handy, since you don’t have to download anything new:
- Fire It Up: Smash that
Win + Gcombo to hoist the Xbox Game Bar onto your screen. - Get the Widget Going: Scout around for the Performance widget. If it’s playing hide and seek, hit those four squares—Widget Menu—and snag Performance.
- Customize Your View: Pin it up with the pushpin icon if you want it hanging around. Tinker with the settings via the gear icon—make sure to tick those FPS and GPU usage boxes.
- Find Its Home: Just drag the widget up to the corner where you want it, and voila, you’ve got yourself a personalized display!
Next, we’ve got MSI Afterburner, which comes with a little setup boost:
- Grab and Set It Up: Scoop MSI Afterburner from their website and let your PC gulp it down.
- Shake Things Up: Open it up and hit the settings gear icon to start noodling around with the options.
- OSD Magic: Head over to the Monitoring tab. Get handy with the wrench and pick FPS and GPU usage. Tick the box to show them on the display.
- Tweak the Display: Shuffle over to the On-Screen Display tab. Set a hotkey to toggle the view on-or-off as you need and shift its position up to the corner.
- Lock It All In: Hit OK to seal the deal on all your handiwork. Your FPS and GPU stats are gonna hang out in the top corner during your next match.
So there you go! These are some solid ways to keep tabs on your FPS and GPU performance without breaking a sweat. Either one should have you sorted, just pick your poison based on what fits the bill for you.