Memory Could Not Be Written Windows 11?
Memory Could Not Be Written Windows 11?
4 Answers
Reasons for “Memory Could Not Be Written” Error in Windows 11:
1.Corrupted System Files: Damaged or missing critical system files disrupt memory operations.
2.RAM Malfunction: Faulty RAM modules or improper seating cause memory allocation failures.
3.Malware Interference: Malicious programs hijack memory processes, triggering instability.
4.Driver Conflicts: Outdated/corrupted drivers (e.g., graphics, audio) clash with OS memory management.
Solutions:
1.Restart Immediately: Resolves transient glitches; proceed if error disappears.
2.Repair System Files:Run sfc /scannow in Command Prompt (Admin).Follow on-screen instructions to fix/replace corrupted files.
3.Test RAM Integrity:Use Windows Memory Diagnostic (mdsched.exe); restart to scan RAM errors.
4.Adjust Virtual Memory:Navigate: Control Panel → System → Advanced → Performance Settings → Advanced → Virtual Memory → Change. Increase paging file size (1.5× RAM recommended).
5.Scan for Malware:Perform full scans with Windows Security or trusted antivirus tools.
6.Update Drivers:Update via Device Manager or manufacturer’s website; prioritize graphics/sound drivers.
7.Clean Windows Installation:Backup data → Create bootable USB → Reinstall Windows 11 if all else fails.
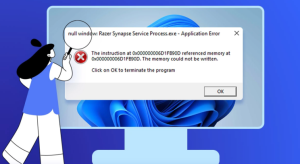
Encountering the ‘memory could not be written’ error in Windows 11 can really throw a wrench in your day. One moment, you’re working away, and the next, you’re hit with that dreaded message: ‘The instruction at 0x00000000 referenced memory at 0x00000000. The memory could not be written.’ You might see it pop up out of nowhere, whether you’re shutting down the PC or just launching a favorite app. Let’s dive into some fixes for this pesky problem, shall we?
So, what’s happening here? Well, this error usually means that some program is trying to mess with memory it shouldn’t be touching. Why? Here are a few likely culprits:
- Corrupted System Files: Sometimes, those vital system files we count on get a little rough around the edges.
- Faulty RAM: Your trusty RAM might be having an off day, leading to weird memory issues.
- Software Conflicts: Love a good software mix? Unfortunately, some apps don’t play nice together.
- Malware Infections: Those sneaky little bugs can create real chaos in your system’s operations.
- Driver Issues: Outdated or cranky drivers—especially the ones handling your graphics—can cause these problems as well.
Alright, let’s get to some of the solutions:
1. Perform a Clean Boot: This means starting Windows without extra clutter. It helps figure out if some background app is stirring trouble. Hit the Windows Key + R, type ‘msconfig’ and enter. Head to the Services tab, check “Hide all Microsoft services,” and disable the rest. Tackle startup items next by popping open Task Manager. Disable stuff one by one, rebooting to see if you’ve nailed the sinner.
2. Run System File Checker (SFC) and DISM: Your digital first aid kit! Command Prompt (as admin), type sfc /scannow, hit Enter, and let it work its magic. For severely messed up Windows images, input DISM /Online /Cleanup-Image /RestoreHealth.
3. Check Disk for Errors: Command Prompt again, type chkdsk C: /f /r (replace C: if needed), and press Enter. Expect prompts; a restart may be needed for a full scan.
4. Perform a Memory Diagnostic Check: Not sure about your RAM? Let ‘Windows Memory Diagnostic’ take a look. Choose a restart option and keep an eye out for errors.
5. Adjust Virtual Memory Settings: Out of virtual memory? Right-click on This PC, hit Properties, then Advanced system settings. Adjust Virtual Memory under Performance settings if needed—usually 1.5 times your RAM should do.
6. Scan for Malware: Time to play detective. Use Windows Security or some trusty antivirus to scan your whole system.
7. Utilize System Restore: If things went south after a change, System Restore’s got your back. Search for it, and follow the breadcrumbs to turn back the clock.
8. Resolve Software and Driver Conflicts: Keep drivers (especially graphics) updated and toss any new software that’s acting suspiciously.
Here’s hoping these tips help you out. If nothing else sticks, you might want to reach out to a pro. It could be hardware giving you grief! No worries, though—tech has a way of bouncing back from the brink.
Getting to the Bottom of “Memory Could Not Be Written” Errors in Windows 11
When you hit the “Memory Could Not Be Written” error on Windows 11, it’s a real pain. Basically, it means something’s not playing nice when it comes to accessing your memory. This can throw off your apps, cause crashes, or even mess with your system’s stability. So, what’s causing all this? Let’s break it down and find some fixes.
Why’s This Happening?
Software Gone Rogue
- Your programs might be trying to write to memory areas they shouldn’t be messing with—thanks to some coding mess-ups.
- Sometimes, apps or antivirus programs are fighting for the same resources, causing chaos.
System Files Acting Up
- You’ve got corrupted system files—whether it’s bad updates, sneaky malware, or random shutdowns causing trouble.
Driver Disaster
- Old or dodgy drivers for your hardware can really screw with how memory is managed.
Hardware Woes
- Your RAM might be on its last legs, too hot to handle, or just not getting along with your motherboard.
- Could be as simple as your RAM being loose or dirty.
Virtual Memory Fumbles
- If your virtual memory is out of whack, you might get these annoying allocation errors.
DEP Giveth and Taketh Away
- Too strict DEP settings can stop apps from touching memory when they need to.
How to Fix It
Quick Fixes
- Give your system a good ol’ restart to shake off temporary issues. Sometimes that’s all it needs!
- Shut down apps you don’t need—it might free up some RAM and reduce conflicts.
Software and System Remedies
- Keep Everything Up-to-Date:
- Hit up Windows Update to get any important patches.
- Check if there’s an update for the app that’s causing trouble.
- Scan your system for any sneaky malware using Windows Security or your favorite antivirus.
- Run System File Checker (SFC):
- Pop open the Command Prompt as admin and run:
-
sfc /scannow dism /online /cleanup-image /restorehealth - This’ll try to fix your corrupted system files.
- Tweak your virtual memory:
- Go to Settings > System > About > Advanced system settings > Performance > Advanced > Virtual Memory.
- Set a custom size or let Windows handle it—it could solve those allocation errors.
Driver Check-Up
- Open Device Manager (try Win + X > Device Manager).
- Expand categories like Display adapters and System devices.
- Right-click on devices and hit Update driver > Search automatically.
- If stubborn issues stick around, grab drivers straight from the manufacturer’s website.
Hardware Troubleshooting
- Test Your RAM:
- Search for Windows Memory Diagnostic and fire up the tool.
- Reboot to run the scan and see what it finds.
- Check RAM Hardware:
- Shut down your PC, reseat those RAM sticks, and give those slots a blast with air to clean them.
- Try each RAM module solo to figure out which one’s on the fritz.
DEP Tweaks
- Open System Properties (Win + Pause/Break).
- Go to Advanced > Performance > Data Execution Prevention.
- Pick Turn on DEP for essential Windows programs only to be a bit more lax.
Going Advanced
Clean Boot Magic
- Fire up System Configuration (Win + R >
msconfig). - Under Services, check Hide all Microsoft services and click Disable all.
- Jump to the Startup tab and launch Task Manager to disable startup entries.
- Reboot and turn services/apps back on slowly to catch the guilty party.
Reinstall Culprits
- If an app keeps crashing, uninstall it and do a fresh install from a trusted source. Sometimes it’s quicker than troubleshooting endlessly.
Restore or Reset It
- Use System Restore to roll back to a time when things were running smooth.
- As a last resort, do a full Windows Reset in Settings > System > Recovery.
Yeah, but How Do You Avoid This Mess?
- Make sure Windows and your drivers are always up to snuff.
- Avoid loading your system with a ton of background apps you don’t need.
- Keep tabs on your RAM’s health with tools like MemTest86 for a heads up before a meltdown.
Honestly, tackling both software and hardware angles usually fixes the “Memory Could Not Be Written” issue. If you’re still stuck after all this, you might need a professional touch to dig deeper.
Running into the ‘memory could not be written’ glitch on your Windows 11? Yup, it’s a nuisance, but there are a bunch of things you can try to shake it off.
First things first, how about making sure your Windows 11 is up to snuff with updates? Just pop open Settings, scoot over to Update & Security, and give Windows Update a tap. Hit ‘Check for updates’ and let it do its thing.
Now, onto those device drivers—kind of like your car needing an oil change. Open up Device Manager by right-clicking the Start menu. Dive into important bits like Display adapters and Sound, video and game controllers. Right-click each device, select ‘Update driver,’ and let it search automatically.
Ever heard of the Memory Diagnostic Tool? It’s like a check-up for your computer’s memory. Hit Windows + R, type mdsched.exe, and press Enter. Pick ‘Restart now and check for problems,’ and just follow the directions.
Here’s the kicker—your virtual memory settings might need a tweak. Head to Control Panel, then System and Security, and find System. Slam the ‘Advanced system settings,’ go under Performance to hit ‘Settings.’ On the Advanced tab, click ‘Change’ under Virtual memory. Uncheck ‘Automatically manage paging file size for all drives,’ then select the system drive and set size that’s right for you.
Got any weird stuff in the mix? It’s time to run a malware scan. Open up Windows Security from the Start menu and go into Virus & threat protection. Choose either ‘Quick scan’ or ‘Full scan,’ then let it sort out any issues.
Feeling adventurous? Try a clean boot. You know the drill: Windows + R, type msconfig, and enter. Hide all Microsoft services on the Services tab, disable the rest, then in the Startup tab, head to Task Manager. Disable all startup items and give your computer a restart.
If all else fails with certain apps, might be time to uninstall them and start fresh. Check out Control Panel > Programs > Programs and Features to dig them out.
Last but not least, a System File Check can work wonders. Fire up Command Prompt as admin, type sfc /scannow, and hit Enter. Let it run its course and see if it fixes anything up.
Hopefully, these steps get you past that pesky memory error. But if it’s still playing hard to get, reaching out to Microsoft Support might just be what the doctor ordered. Their website usually has some good info: Microsoft Support. Good luck!