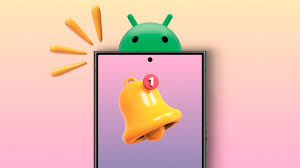
How to Make Custom Notification Sounds?
How to Make Custom Notification Sounds?
5 Answers
For Android Devices:
Prepare Sound File: Ensure your audio clip is in MP3 or WAV format. Trim/edit files using tools like Wondershare Filmora if needed to reduce size while preserving quality.
Save to Device:
Create a folder named Notifications in your device’s internal storage (if not existing).Move your sound file to this folder.
Set as Notification Sound:
Go to Settings → Sound & vibration → Default notification sound.Tap + and select your custom audio file from the Notifications folder.
For iPhone:
Convert Audio: Use tools (e.g., Kapwing) to convert files to M4R format.
Transfer via iTunes/Music App:Connect iPhone to computer, open Music App (or iTunes).Drag the M4R file into the library, then manually drag it to your iPhone under “Devices” in the sidebar.
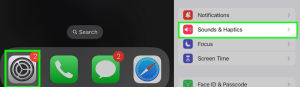
Enable Custom Sound:Navigate to Settings → Sounds & Haptics (or Sounds on older iOS).
Tap Text Tone → Ringtones → Select your uploaded sound.
Changing up your notification sounds is a great way to add a personal touch to your device. Instead of those boring default tones, you can switch things up with sounds that really suit your style. Here’s a step-by-step on how to do it.
Understanding Notification Sounds and Their Customization
Notification sounds are the little dings you hear when you get a message, email, or reminder. Most devices come with built-in sounds, but let’s face it, those are pretty bland. Setting your own notification sounds lets you pick tones that stand out and are easier to recognize.
Creating Custom Notification Sounds
- Pick or make a sound: Snag a clip from a favorite song, a hilarious movie quote, or record your own sounds like your dog barking or you humming a tune. Get creative!
- Edit it: Use tools like Audacity or GarageBand to trim the audio down to 5-30 seconds. Adjust the volume and add a bit of flair if you want.
- Save the file: Make sure to save it as an MP3 or WAV file and give it a name that you’ll remember.
Setting Custom Notification Sounds on Android Devices
- Default notification sound:
- Head to “Settings” → “Sound and Vibration” → “Default Notification Sound.”
- Tap the “+” icon, find your custom sound file in the “Notifications” folder, and boom – you’re done.
- App-specific sounds:
- For Android 13 or earlier: Go to “Settings” → “Apps,” find the app, tap “Notifications,” and pick your sound.
- For Android 14 or later: Similar steps, just an extra tap at “Notification categories” after hitting “Allow notifications.”
Setting Custom Notification Sounds on iOS Devices
iOS likes to keep things tight, so there are some limits here:
- Open “Settings,” tap “Sounds and Haptics,” then “Ringtone” or “Text Tone,” and select “Custom Ringtones.” Either use an imported sound or create a new one and set it up.
Assigning Custom Notification Sounds to Specific Contacts
- On Android: Open Contacts, pick your contact, tap “Edit,” scroll down to “Add another field” or “Custom notification sound,” and select your tone.
- On iOS: Pretty similar, but you’ll find it under the “Edit” option in the Contacts app, then “Ringtone” → “Text Tone.”
Tips for Creating and Managing Custom Notification Sounds
- Keep it short and sweet: Long ringtones can get annoying. Aim for something catchy and quick.
- Match the vibe: Different sounds for different notifications. A soft chime for calendar alerts, a louder ding for texts.
- Keep things fresh: Swap out old sounds for new ones periodically to keep things interesting. Organize files in folders, so you don’t lose track.
Dealing with Common Problems
- If your sound isn’t showing up, double-check the file format and location. Try restarting your phone or converting the file if needed.
- If the sound isn’t playing, make sure the file isn’t corrupted and that notifications for the app are allowed.
And there you have it! Creating custom notification sounds is a fun way to make your device truly yours. Whether you’re crafting your own or using pre-made ones, it’s a neat trick to jazz up your tech life.
Hey there! So, you’re probably wondering how you can pimp out your Android phone with some custom notification sounds, right? Well, I’ve got you covered, and trust me, it’s not rocket science!
First things first, you gotta get your sound files ready. Pick your favorite jam or any sound that makes you go “yep, that’s the one!” Make sure it’s in MP3 or WAV format—that’s the usual deal for Android.
Now here’s the fun part: getting that sound onto your phone! You can plug your phone into your computer and drag that file over or just download it straight to your device. Easy peasy.
But wait, there’s a catch! You need to stash the sound file in the right spot, otherwise, your phone won’t even know it’s there. Grab a file manager app (if you haven’t got one already), and then dive into Internal Storage. Find the ‘Notifications’ folder—or make it if it’s gone AWOL.
Okay, now move your sound file into this Notifications folder. This is gonna make it pop up later when you’re picking sounds.
Onto setting up your custom sound! You can do this for all notifications or just for individual apps. Totally up to you!
To set it for everything, it’s a trip to the settings: hit up your Sounds and Vibration section, then find Notification Sound. Your masterpiece should be in that list—nice and easy to pick.
If you’re feeling adventurous and want different sounds for different apps, here’s how: let’s say you want a funky sound for your text messages—open the messaging app, hit the three-dot menu, and head into Notifications settings. You’ll see different categories, so pick one and slap on your sound.
Last but not least, let’s test this baby out! Send yourself a cheeky message or do something that’ll trigger a notification. If all goes well, you’ll hear your custom sound loud and clear.
Honestly, what matters is to make sure those sound files are tucked away in the right spot and then flipping the settings to suit your style. And once you’ve nailed it, it’s a piece of cake every time! Happy customizing!
Guide to Creating Your Own Notification Sounds
\n
Let\’s face it, having your own notification sounds just makes your phone or tablet feel more like yours. Whether you\’re jazzing up a text alert or making sure you can tell when your favorite app is calling, customizing those sounds does the trick. Here\’s how you can dive into this world of sound tweaks!
\n
Setting the Stage
\n
So, what\’s the deal with notification sounds? They\’re those little audio dings or chimes that let you know something\’s up—like a new message or a call. Swapping out the usual sounds for ones you handpick is where the fun begins.
\n
- \n
- Make it Personal: Find a sound that screams \”\”you\”\” and slap it on your favorite contacts or everyday apps.
- Stay Alert: Choose sounds that help you instantly know whether it\’s time to drop everything or just pause to check the latest notification.
- Make an Impression: Developers can give their apps a cool sonic vibe with custom tones. Stand out, folks!
\n
\n
\n
\n
How Regular Users Can Tinker with Sounds
\n
Rocking it on iOS
\n
- \n
- \n
Pimp Your Contact Sounds:
\n
- \n
- Head into Contacts → Grab one → Hit Edit → Tap Text Tone → Pick from the list or sneak in a custom tone via iTunes.
- Yep, iTunes or Apple’s shop is your go-to for custom stuff, not much leeway here.
\n
\n
\n
- \n
Apps to the Rescue:
\n
- \n
- Fire up GarageBand or similar apps to cook up your own sounds. Then, launch Settings > Sounds & Haptics to get them rolling.
\n
\n
\n
\n
\n
Spicing Up Android
\n
- \n
- \n
Going Wide:
\n
- \n
- Jump into Settings > Sound & vibration > Notification sounds and pick a track from either your stocked or downloaded collection.
- Pro Tip: Place your sound files in a folder named
Notificationsfor smoother sailing.
\n
\n
\n
- \n
Focus on Apps:
\n
- \n
- If your go-to apps are something like WhatsApp or WeChat, dive into their options to give them a personal touch. For WeChat:\n
- \n
- Hop into Me → Hit Settings → Go to Notifications → Under Message Notifications, pick your favored jingle.
\n
\n
\n
\n
- If your go-to apps are something like WhatsApp or WeChat, dive into their options to give them a personal touch. For WeChat:\n
\n
\n
\n
How Developers Can Weave Magic
\n
Craft for Android Apps
\n
- \n
- \n
Button Down the Sound File:
\n
- \n
- Slide your audio (e.g., .mp3, .wav) into the
res/rawzone.
\n
\n
- Slide your audio (e.g., .mp3, .wav) into the
- \n
Channel Your Inner Notification Wizard (Android 8.0+):
\n
\n(Build.VERSION.SDK_INT >= Build.VERSION_CODES.O) { \n NotificationChannel, channel.setSound(Uri.parse(\"\"android.resource://\"\" + getPackageName() + \"\"/\"\" + R.raw.custom_sound), \n new AudioAttributes.Builder().setUsage(AudioAttributes.USAGE_NOTIFICATION).build()); \n NotificationManager manager = getSystemService(NotificationManager.class); \n manager.createNotificationChannel(channel); \n} \n\n
- \n
- Heads-up: Once you set a channel’s sound, consider it locked.
\n
\n
- \n
Assemble the Notification:
\n
\nNotificationCompat.Builder(context)\n .setSmallIcon(R.drawable.icon) \n .setContentTitle(\"\"Title Here\"\") \n .setContentText(\"\"Here goes the message\"\") \n .setSound(Uri.parse(\"\"android.resource://\"\" + getPackageName() + \"\"/\"\" + R.raw.custom_sound)); \n\n
\n
\n
\n
\n
Making Waves in iOS Apps
\n
- \n
- \n
Sound Check in Xcode:
\n
- \n
- Toss those audio files (.caf, .aiff, .wav) into your project and keep them under 30 seconds.
\n
\n
- \n
Get Notified:
\n
\nlet content = UNMutableNotificationContent() \ncontent.title = \"\"Title Here\"\"\ncontent.body = \"\"Message content\"\"\ncontent.sound = UNNotificationSound(named: UNNotificationSoundName(rawValue: \"\"customSound.wav\"\")) \nlet trigger = UNTimeIntervalNotificationTrigger(timeInterval: 10, repeats: false) \nlet request = UNNotificationRequest(identifier: \"\"notification_id\"\", content: content, trigger: trigger) \nUNUserNotificationCenter.current().add(request) \n\n
\n
\n
\n
When Things Go South
\n
| What’s the problem? | Here’s a fix |
|---|---|
| Silence on Android | Make sure your file\’s cozy in res/raw, and double-check that notification channel setup. |
| iOS doesn’t like your format | Revamp it to .m4r for ringtones or stick to supported formats like .aiff. |
| No Ping for Certain Contacts | Snoop around your contact’s notification settings—apps like WhatsApp have their own rules. |
| Permission Problem | Ask for POST_NOTIFICATIONS on Android 13 and onwards. |
\n
Top Tips and Tricks
\n
- \n
- Try Different Devices: Just because it works on one gadget doesn’t mean it’ll work on all. Test it out!
- Size Matters: Keep your sound files short and sweet to avoid lagging. Aim for less than 5 seconds.
- Put Users in Control: Let folks flip the switch on sounds within your app.
\n
\n
\n
\n
And there you have it! You can customize notification sounds to your heart\’s content these days, whether you’re just sprucing up your phone or putting some extra shine on your app. For deep dives, third-party apps or APIs like Firebase Cloud Messaging might be just what you need.
So you want your phone to play your own tune when notifications buzz? Easy peasy! Let’s get into how you can set fun, custom sounds for your alerts on both Android and iPhone.
For Android:
Kick things off by grabbing the sound file you want. Just make sure it’s in MP3, WAV, or OGG format. You’ve got it sorted? Great! Now, transfer this file over to the Notifications folder on your device—think: Internal Storage > Notifications.
Now comes the fun part—setting it! Dive into Settings on your phone. Tap on Sound & vibration, and then go for Notification sound. Voila! Pick your jam from the list, and you’re golden.
Oh, and if you’re jazzing up app notifications like WhatsApp: Open up the app, head to Menu, dabble in Settings, and jump to Notifications. Once you’re there, you should find Notification tone. Pick your custom sound, and you’re sorted!
For iPhone:
Here’s the kicker for iPhone users—you’ll need that sound file in M4R format. You can use a tool or iTunes for the job. Once converted, plug in your iPhone to a computer. Open up iTunes (or Finder if you’re on a Mac), and drag that sweet M4R file into the Tones section. Sync it up, and you’re ready to roll!
Next step, go to your iPhone’s Settings. Hit up Sounds & Haptics, then tap on the alert type you fancy changing, like Text Tone. Once there, pick your custom sound from under Ringtones.
Honestly, having your phone chime with one of your favorite tunes whenever you get notifications can be a blast. Plus, it’s a neat little way to make your device truly yours.