How Do I Access a Shared Folder on a Network in Windows 11?
How Do I Access a Shared Folder on a Network in Windows 11?
5 Answers
Before accessing shared folders, you typically need to enable network discovery and file sharing in Windows 11 settings, as these features are often disabled by default.
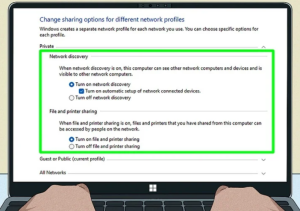
Enable Network Discovery and File Sharing:Press Win + I to open Settings. Go to Network & internet > Advanced network settings > Advanced sharing settings. Under the Private networks profile section (used for trusted networks like your home or office):Turn On Network discovery. Turn On File and printer sharing.(Optional but recommended) Check Turn on automatic setup of network connected devices. If you are on a public network (e.g., cafe, library) and need to access shares (use caution), expand the Public networks section and turn on the same settings.
Access the Shared Folder:You have two primary methods:
1.Using the Run Dialog (Direct Path)
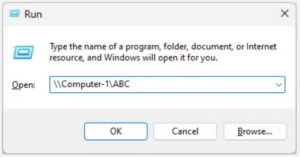
Press Win + R to open the Run dialog box. Type the network path to the shared folder in the format: \\ComputerName\SharedFolderName.Replace ComputerName with the actual name of the computer sharing the folder. Replace SharedFolderName with the name of the shared folder itself.
Example: if the computer name is Computer-1 and the shared folder name is ABC, you would type \\Computer-1\ABC in the Run dialog box. Press Enter or click OK.
If prompted, enter a valid username and password that has permission to access the shared folder on the target computer.
2.Using File Explorer (Network Browse)
Open File Explorer (press Win + E or right-click the Start button and select File Explorer).
In the left-hand navigation pane, click on Network. This will scan for devices on your local network with sharing enabled. Double-click the name of the computer that is sharing the folder you need. You will see a list of shared folders and printers available on that computer. Double-click the specific shared folder you want to access. If prompted, enter a valid username and password that has permission to access that shared folder.
Credentials: You’ll often need the username/password of an account on the computer sharing the folder, not necessarily your local PC account.
Network Type: Ensure you enabled discovery/sharing under the correct network profile (Private/Public) that matches your current connection.
Firewalls/Antivirus: Occasionally, these might block network access; you may need to temporarily disable them or add exceptions if connection issues arise.
Sharing folders on a network is a great way to keep files accessible for everyone. So if you’re on Windows 11 and need to get to a shared folder, here’s what you can do.
Before Diving In
- Check your network connection — Double-check if your computer is hooked up to the right Wi-Fi or Ethernet network. If things look a bit iffy, try reconnecting or rebooting your router.
- Enable network discovery and file sharing — Open Settings with Windows + I, hit Network & Internet, and pick either Ethernet or Wi-Fi depending on what you’re on. Make sure your network profile is set to Private. Scroll down to the Advanced network settings, click Network and Sharing Center under More settings. Then, click Change advanced sharing settings on the left, turn on network discovery and file sharing, and save those changes.
- Check the shared folder’s permissions — On the computer sharing the folder, right-click the folder and select Properties. Head over to the Sharing tab and click Advanced Sharing. Ensure the right users can access it by clicking Permissions.
Ways to Access Shared Folders
- File Explorer:
- Open File Explorer by clicking the folder icon on the taskbar or pressing Windows + E.
- Click Network on the left side. If it asks to enable network discovery or file sharing, say Yes.
- Find the computer with the shared folder and click it. If a password prompt pops up, enter the details.
- Double-click the shared folder to check out its contents.
- Map Network Drive:
- Open File Explorer and click This PC.
- Hit the Computer tab at the top and choose Map Network Drive.
- Pick a drive letter from the dropdown menu.
- Enter the shared folder’s network path, like \\ComputerName\\SharedFolder, or browse to locate it.
- Check Reconnect at sign-in if you want the folder to reconnect each time you log in.
- Click Finish and if asked for credentials, pop them in. The mapped drive will then show up in This PC under Network locations.
- Run Command:
- Press Windows + R to open the Run dialog.
- Type the shared folder’s network path, like \\ComputerName\\SharedFolder, and hit Enter. Replace ComputerName with the actual name of the computer sharing the folder.
- If needed, enter a password. This action will open the folder in File Explorer.
- Command Prompt:
- Press Windows + X and choose Windows Terminal or Command Prompt.
- Type net use Z: \\ComputerName\\SharedFolder and press Enter, changing Z: to your preferred drive letter.
- If you’re asked for login details, provide them.
- You’ll be able to access the shared folder using the mapped drive letter in File Explorer.
- Windows Search:
- Click the Search icon on the taskbar or press Windows + S.
- Type the name of the shared folder or any file in it.
- Click the result relevant to your search to access the folder.
If You Hit a Snag Accessing Shared Folders
- Check network connection — Ensure both computers are on the same network. Verify Wi-Fi or Ethernet settings on both ends. If all else fails, restart your router to reset connections.
- Verify network discovery settings — Head to Control Panel > Network and Sharing Center. Make sure network discovery is active for both public and private networks.
- Firewall settings — Search for Windows Security in the Start menu. Open it, go to Firewall & network protection, and select Allow an app through the firewall. Click Change settings and enable File and Printer Sharing.
- Check shared folder availability — Maybe the folder got deleted, moved, or sharing settings were changed. Confirm with whoever’s sharing the folder whether it’s still accessible and where it’s located now.
- Windows updates — Sometimes, outdated systems mess things up. Go to Settings > Update & Security > Windows Update to check for updates. If there are any, install them and restart your computer.
So there you have it—a handful of ways to get to shared folders on a network in Windows 11. Just ensure your computer is part of the same network, and you can use File Explorer, map a network drive, the Run command, Command Prompt, or even Windows Search depending on what feels right. And remember, if things don’t go smoothly, troubleshoot your network connection, settings, and availability of the shared folder.
So, you’re trying to get into a shared folder on a network using Windows 11, right? Here’s how you can do it without ripping your hair out!
First Things First: Flick the Switch on Network Discovery and File Sharing
Before diving in, double-check that both your machine and the one hosting the goods has network discovery and file sharing lit up.
-
Dive into Settings:
- Hit the Start menu and go for Settings—you know, that gear icon.
-
Hop over to Network & Internet:
- Inside Settings, tap on Network & internet.
- Sneak into Advanced Sharing Settings:
- Scroll on down and hit up Sharing options.
- Under the Private section, flip on Network discovery and File and printer sharing.
- Nix Password Protected Sharing (if you’re cool with it):
- Sticking in the advanced zone, under All Networks, maybe turn off password protection to keep things smooth sans credentials.
Hunting Down the Computer with the Jackpot
You’ll need to get the name or IP of the computer hogging the shared folder.
- Fire Up File Explorer:
- Give that icon a click on the taskbar or just hit
Windows + E.
- Give that icon a click on the taskbar or just hit
- Hit the Network Section:
- Inside File Explorer, find Network on the left. Give it a click.
- If you get the “Network discovery is turned off” spiel, go ahead and turn it on.
- Scope Out Shared Computers:
- A list of network bud computers should pop up. Double-tap the one with the goods.
Cracking Open the Shared Folders
After you’ve tracked down the right machine, you’re ready to raid its shared folders.
- Go for Computer Name:
- Once you double-click, you’ll find the lineup of the shared folders from that device.
-
Chuck in Credentials (if it asks):
- If there’s a pop-up for a username and password, fill it with the details of an account that’s got access rights.
-
Delve into Shared Folder:
- Once logged in, double-click any folder to get right to its stuff.
Do Yourself a Favor: Map That Bad Boy (Optional)
If you keep coming back to that shared folder, consider mapping it as a network drive. Here’s the lowdown:
- Right-Click This PC in File Explorer:
- Go for “Map network drive.”
- Set Drive Letter and Path:
- Pick a free drive letter from the menu.
- In the Folder box, type
\\computername\sharename(swapcomputernameandsharenamefor your actual details).
-
Stick with Reconnect (if you’re feeling it):
- Check “Reconnect at sign-in” to keep it mapped every time you fire up Windows.
-
Finish Mapping:
- Hit Finish, and you’re all mapped out.
Follow these steps, and you’ll be live and kicking with those shared folders over your network using Windows 11 in no time.
How to Access a Shared Folder on a Network in Windows 11
Trying to get to a shared folder on your home or office network in Windows 11? Sometimes it feels like solving a puzzle, but once you know the right steps, it gets a lot easier. So, let’s roll up our sleeves and see how you can smoothly get to those shared files and folders.
Why Share Over the Network?
Sharing files over a network means you don’t have to juggle USB drives or email attachments just to get a file to someone else on the same network. Windows 11 does this using something called SMB, which just means it’s a way for computers to chat and share stuff. Folks often run into snags here—like wrong permissions, network discovery being off, or firewall troubles blocking the way.
Getting Started: Two Simple Methods
1. File Explorer Route
- First up, open File Explorer by hitting Win + E or just clicking that little folder icon on your taskbar.
- Then, on the left side, find and click ‘Network.’ You might see a prompt asking you to turn on Network Discovery and File/Printer Sharing. Go ahead and do that.
- Take a look around for the device with the shared folder (like another computer or a NAS). Double-click on it to peek inside.
- If the system asks for it, enter the username and password to get in.
2. Try the “Run” Shortcut
- Hit Win + R to bring up the Run command box.
- Type in the shared folder’s location like this: \\[Device-Name-or-IP]\[Shared-Folder-Name] (for example, \\DESKTOP-ABC\Documents).
- If you’re nudged to input credentials, just type them in.
What If Things Don’t Go Smoothly?
Running into a bricked wall? Here are some common hiccups and ways to sort them out:
1. Permission Headaches
- These often crop up because permissions haven’t been set up correctly.
- Right-click the folder you’re trying to share, hit ‘Properties,’ and under ‘Sharing,’ go to ‘Advanced Sharing.’
- Make sure ‘Share this folder’ is checked, and set permissions for ‘Everyone’ to ‘Allow’.
2. Network Discovery Acting Shy
- If your computer’s not spotting the shared devices, network discovery might be off.
- Jump into Settings > Network & Internet > Advanced Network Settings > Advanced Sharing Settings.
- Under ‘Private Network,’ tick the options to turn on network discovery and file/printer sharing.
3. Password Pop-ups
- If Windows keeps asking for a password every time, that’s password-protected sharing at play.
- Head on over to Control Panel > Network and Sharing Center > Advanced Sharing Settings.
- Expand ‘All Networks’ and turn off password-protected sharing. Don’t worry, you’re still safe!
4. Firewall Playing Traffic Cop
- Sometimes your firewall thinks it’s doing you a favor by keeping things a bit too secure.
- Tweak the settings in Windows Security > Firewall & Network Protection > Allow an app through the firewall.
- Make sure File and Printer Sharing is okay to pass through, whether you’re on a private or public network.
5. Oops, Wrong Address!
- Yeah, it happens—typos in the device name or IP can mess things up.
- Check the device’s name under Settings > System > About.
- If needed, just use its IP address (like \\192.168.1.5\SharedFolder).
Extra Tricks Up Your Sleeve
In case things still aren’t working, try restarting the Workstation service. Open the Run dialog (Win + R), type services.msc, find Workstation, and restart it. Keeping your network drivers up-to-date is another smart move. And if you’re feeling adventurous, you can always test out third-party tools that help simplify sharing.
Key Reminders
- Remember, all devices should be on the same network. And try to keep your shared folder names free of special characters, like # or &.
- In work settings, double-check any domain rules or VPN setups with your IT folks to make sure you have the green light.
Round up these tips, and you’ll be sharing away in no time! If the connection’s still being tricky, don’t forget to peek at Windows updates or consider resetting your network settings.
So you want to dive into accessing shared folders on a network with Windows 11, huh? Let’s make that a breeze.
First off, make sure you’re hanging out on the same network as the computer sharing the goods. No point if you’re on different networks. Just right-click the network icon sitting in your taskbar and click open the Network & Internet settings—it’ll tell you if you’re connected right. Keep that info under ‘Status’ in check, okay?
Next up, let’s get some sharing magic going. Hop over to the “Control Panel” and slide into the “Network and Sharing Center.” From there, just switch on that network discovery and file and printer sharing—it’s under the “Private” profile.
Now we’re talking business. Fire up File Explorer. In the address bar, type \\[ComputerName] or \\[IP address]—whatever fits ya. Hit enter and voila! You should see those shared folders up in your face. Double-click to hop into your chosen folder.
Feeling fancy? Let’s map this bad boy as a network drive. Head over to File Explorer, smash “This PC” on the left pane, then tap on “Map network drive” from the menu on the top. Pick a letter you like for the drive, punch in the network address of the shared folder—like \\[ComputerName]\\[SharedFolderName]—and click “Finish.”
Got a nugget of wisdom for ya: permissions are key. Right-click on that shared folder, go to “Properties,” then under the “Sharing” tab, hit “Advanced Sharing.” Check off “Share this folder” and tweak permissions however you need.
Honestly, don’t forget about those firewall settings—they’re sitting under “Start” > “Settings” > “Privacy & security” > “Windows Security” > “Firewall & network protection”. Just make sure File and Printer Sharing is giving the green light through the firewall.
And if you hit a bump, have a peek at Microsoft’s support page for more deets, just search for their take on file sharing—easy peasy!
With all this info, cruising through shared folders on a Windows 11 network should be like a walk in the park.