How Can I Disable My Laptop’s Internal Speakers on Windows 11?
How Can I Disable My Laptop’s Internal Speakers on Windows 11?
4 Answers
You have two primary methods to disable the internal speakers on your Windows 11 laptop:
Using Device Manager
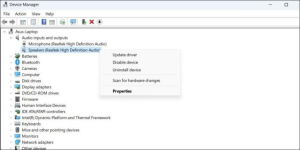
Open Device Manager: Right-click the Start button or press Win + X, then select Device Manager.
Locate Audio Devices: Expand the section labeled Sound, video and game controllers.
Disable the Speakers: Find the entry representing your laptop’s internal speakers (often named after your audio chipset like “Realtek Audio”, “Speakers”, or similar). Right-click on it and select Disable device.
Confirm: If prompted, confirm the action by clicking Yes. The disabled speakers will now disappear from your available audio outputs.
Using the Settings App
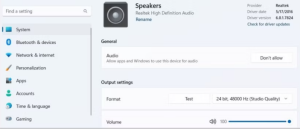
Access Sound Settings: Right-click the speaker icon in your system tray (bottom-right taskbar corner) and select Sound settings.
Select Internal Speakers: Under the Output section, locate and click on the entry representing your laptop’s internal speakers.
Disable Audio: Click the drop-down menu next to Audio. From the options that appear, select Don’t allow. Once disabled using this method, the internal speakers will no longer be listed under your output devices in the Sound settings menu. To re-enable them later, you’ll need to access them again through Device Manager.
Device Manager physically disables the speaker driver. Settings prevents Windows from using the speakers for audio output. Both achieve the core goal of muting the internal speakers.
Hey there! Trying to silence those internal laptop speakers on Windows 11? No problem, I’ve got a few tricks up my sleeve for you. Let’s dive in and fix that.
First up, hit up your Settings. Just press Win + I to pop open the app. Slide over to ‘System’ on the left, and get cozy with ‘Sound’ on the right. Scroll your way down to ‘All sound devices’ under the Advanced section and find those pesky internal speakers under Output devices. Click on them, then tap ‘Don’t allow’ to shut those speakers off.
Next, this little hack through the Control Panel might just be the ticket. Type ‘Control Panel’ in the search bar and bring it up. Make your way to ‘Hardware and Sound,’ then hit ‘Sound.’ Over in the Playback tab, where all your audio gadgets chill, right-click on your internal speakers and sucker punch them with ‘Disable.’ Hit OK, and you’re golden.
Or, if you’re feeling adventurous, open up Device Manager by right-clicking the Start button and selecting ‘Device Manager.’ Expand the ‘Audio inputs and outputs’ section. Locate your internal speakers, give them a right-click, and select ‘Disable device.’ Confirm any prompts that might pop up.
A couple of extra tips: If the speakers keep messing with you, ensure your external audio device is the main star by setting it as the default playback device. Also, sometimes a quick restart helps set things straight.
By following these steps, you’ll have your laptop’s internal speakers in mute mode while your headphones or external speakers sing the right tune. Happy listening!
Got issues with your laptop’s internal speakers on Windows 11? Here’s how you can silence them, whether you just want a temporary break or you’re ready to give them the boot for good.
1. Turning Off Internal Speakers with Device Manager
Device Manager is like your hardware traffic cop, deciding what gets recognized by Windows. Here’s how to tell your internal speakers to pipe down:
- Hit
Win + Xand choose Device Manager. - Find and expand Sound, video, and game controllers.
- Right-click your audio device (it might be called Realtek Audio, Conexant SmartAudio, or something else).
- Pick Disable device and confirm your choice.
- Heads up: This might mute everything. If you still want to hear stuff through external speakers or headphones, scroll on to Method 3.
2. Changing Default Audio Output
Want to keep using your headphones or Bluetooth speakers without being interrupted by those pesky internal ones? Follow these steps:
- Right-click the Speaker icon in the taskbar and choose Sounds.
- Go to the Playback tab and pick your device of choice.
- Hit Set Default and Apply.
- Pro tip: If your gadget isn’t in the list, make sure it’s plugged in and recognized by Windows.
3. Using BIOS/UEFI to Disable Speakers
For those brave enough for a deep dive into the guts of their PC—this one’s for you:
- Restart your laptop and keep an eye out for those keys to press during boot-up, like F2, Delete, or Esc.
- Find Advanced settings and head over to Onboard Devices Configuration (names vary with brands).
- Set Internal Speakers to Disabled.
- Save and exit.
- Tip: BIOS layouts differ from one manufacturer to another, so crack open that dusty user manual or hit the support page if needed.
4. Tweaking Audio Services
If software is causing headaches, let’s nip it in the bud:
- Press
Win + R, typeservices.msc, and hit Enter. - Find Windows Audio and Windows Audio Endpoint Builder.
- Right-click them, go to Properties, and set both Startup type to Disabled.
- Click Apply and restart your laptop.
5. Rollback or Uninstall Audio Driver
Sometimes a new update messes things up. Fix it this way:
- Open Device Manager, expand Sound, video, and game controllers.
- Right-click the audio driver and go to Properties, then hit the Driver tab.
- Choose Roll Back Driver or Uninstall Device.
- Restart the laptop to reinstall the driver (do this only if you want the internal speakers gone for good).
Tips and Tricks
- Physical buttons: Your laptop might have a mute button or a function key with a speaker symbol—try it out!
- Third-party apps: Apps like SoundSwitch or Audio Router give you more control over sound outputs.
- Group Policy: If you’re on a company laptop, you can use gpedit.msc to restrict audio access.
Why They Might Turn Back On
- Updates: Major updates sometimes reset your sound settings. So, you might need to revisit Method 1 or 2.
- Driver issues: Old or incompatible drivers can mess with settings. Refer to Method 5 or get brand-specific drivers.
- Detection drama: Plugging in or pulling out other devices can flick the switch back to internal speakers. Method 2 helps dodge that.
Hopefully, these tips help you keep your internal speakers quiet when you want them to be. If they keep acting up, the manufacturer’s support page is your best bet for more tailored advice.
Alright, so you’re trying to mute those internal speakers buzzing from your laptop on Windows 11? Good news is, it’s no rocket science! Here’s how to hush them for good:
First off, let’s hit up the Device Manager, shall we?
- Give a right-click to that Start menu button and pick out Device Manager from the list.
- Dive into the Sound, video, and game controllers section.
- Spot your internal speaker device—usually called something like High Definition Audio Device—and right-click on it.
- Choose Disable device, and when it asks if you’re sure, just go ahead and say yes!
Now, if you’re more into the Sound settings vibe:
- Find the Sound icon chillin’ in your taskbar, right-click it, and head over to Open Sound settings.
- Look for the Output section and click Manage sound devices.
- Under Output devices, pick out the internal speaker and slap that Disable button.
Feeling adventurous? Get this—there’s the BIOS method, too. Here’s how you do it:
- Restart your laptop and stamp down on the required key to jump into BIOS (it could be F2, F10, or DEL—depends on the model).
- Navigate to the Advanced or Peripherals tab.
- Sniff out the internal speaker setting and turn it off.
- Save those changes and exit BIOS—your laptop’s gonna restart, all good!
Using any of these tricks should help you keep those speakers dead silent. Need more tips? Your laptop’s user manual could be a lifesaver, or you can cruise over to the Microsoft support website for a helping hand.