How Do I Scroll Inactive Windows When I Hover Over Them?
How Do I Scroll Inactive Windows When I Hover Over Them?
4 Answers
Windows offers a fantastic feature that lets you scroll windows without having to click and activate them first. This is particularly powerful when you have multiple windows arranged side-by-side. Instead of constantly switching focus, simply move your mouse pointer over the inactive window you want to scroll and use your scroll wheel – it will respond instantly.
To enable this booster:
Open Settings: Right-click on the Windows Start button and select Settings.
Go to Devices: Click on the Devices category within the Settings window.
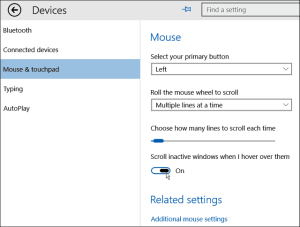
Select Mouse Options: Choose Mouse & touchpad from the left-hand menu.
Enable the Feature: Turn On the toggle switch labeled “Scroll inactive windows when I hover over them”.
Now, hovering your mouse over any inactive window allows seamless scrolling with your mouse wheel.
The Lowdown on \’Scroll Inactive Windows When I Hover Over Them\’
Ever find yourself juggling loads of open windows on your computer screen, catching yourself thinking, \’If only I could scroll through these while hovering!\’? Well, Windows has got your back with a nifty feature that lets you do just that. Instead of clicking all over the place, you can simply hover your mouse over a window that’s not in focus and scroll away. It\’s a game changer, especially if you\’re the multitasking type who likes to have a million things open at once!
What’s the Secret Sauce?
The magic here is simple. Picture yourself typing an email, but you need to glance at that spreadsheet you’ve got open off to the side. Just hover your mouse over the spreadsheet—no clicking needed—and scroll through it to find what you need. It’s like having superpowers that make your workflow smoother and more efficient, especially on those big \’ol monitors where there\’s ample room for everything.
How Do You Turn It On or Off?
Okay, so you want to fiddle with this setting in Windows 11—easy peasy. Here’s how you do it:
- Pull up Settings: Quick way? Hit
Win + Iand voilà! - Check Out Mouse Settings:
- Click on Bluetooth & devices on the sidebar.
- Select Mouse from the list.
- Make Your Move:
- Find the toggle labeled \”Scroll inactive windows when I hover over them.\”
- Flip it to On or Off—whatever floats your boat.
And just like that, you’re set! Although, sometimes a restart might be needed to get everything in sync.
Got Other Tricks Up Your Sleeve?
Feeling adventurous or just plain curious about other ways to manage this feature? You’ve got options, folks!
Playing Around with Registry Editor
- First, search for
regeditin the Start menu and hit Enter. - Navigate here:
HKEY_CURRENT_USER\\Control Panel\\Desktop. - Find or pop in a DWORD value named
MouseWheelRouting.- Set it to
2to activate the feature. - Switch it to
0to turn it off.
- Set it to
- Close it up and give your computer a quick restart.
Using the Command Line Like a Pro
Don\’t mind typing a bit? Open up Windows Terminal, then choose Command Prompt or PowerShell:
- To enable scrolling for inactive windows, type this:
reg add \"HKCU\\Control Panel\\Desktop\" /V MouseWheelRouting /T REG_DWORD /d 2 /FTo shut it off, use:
reg add \"HKCU\\Control Panel\\Desktop\" /V MouseWheelRouting /T REG_DWORD /d 0 /F - Another quick restart should do the trick.
Wrapping It Up
Honestly, getting to scroll through inactive windows is pretty darn handy if you\’re constantly switching between apps and want to keep your focus intact. Whether you tweak the settings the easy way or go the nerdy route with registry edits or command lines, it\’s all about making your digital life a bit easier.
So, there you have it—give \”Scroll inactive windows when hovering\” a whirl and boost that multitasking mojo!
I’m glad you’re here, ready to tackle the quirks of scrolling through inactive windows just by hovering over them. This feature is all about making multitasking a breeze, letting you work with background windows without the hassle of clicking to bring them into focus. Let’s dive into the why, the how, and, of course, the fixes.
What’s Up with This Quirk?
Alright, let’s break it down. Most operating systems like Windows, macOS, and Linux roll with the idea that you need to click a window to scroll it. The deal is, without activating them, you might set off unintended actions just by hovering. Here’s why it happens:
- Operating System Choices: It’s all about capturing user intention. Clicking a window is a clear signal, but hovering? It’s a bit more chill, and there’s a chance of unintentional clicks.
- Input Rules: Apps typically skip on hover scrolling unless the window is active because they don’t want any accidental input.
- Tech Limits: You might be stuck with default settings or outdated drivers that aren’t quite up to speed with these fancy scrolls.
How to Get This Sorted
Here’s where we roll up our sleeves and dive into solutions tailor-made for your OS:
Windows
Yeah, Windows can be picky, but there’s always a workaround:
- Third-party tools are your friend. Grab something like WizMouse to save the day. Install it, run it, and tweak the settings for scrolling inactive windows.
- Want to get a bit techy? Try a Registry Tweak. Open up the Registry Editor, find the right folder, and make the changes. But hey, it’s more advanced, and not every app plays nice with this trick.
macOS
Apple lovers, it’s time! You’ve got two main ways:
- If you’re feeling brave, use Terminal commands to get scrolling up and running.
- Or, pick a third-party app. Scroll Reverser works wonders here—get it installed, fiddle with the preferences, and let the scrolling magic happen.
Linux (GNOME/KDE)
Linux warriors, onward! Here’s the scoop:
- Dive into command-line territory and compile libinput hacks to customize scroll behavior.
- Or keep it simple with desktop extensions, especially on GNOME or KDE environments. Navigate to ‘Focus Follows Mouse’ settings and you’re golden.
Oh, But Wait—Troubleshooting Time
Let’s not forget the inevitable hiccups:
- App Roadblocks: Some apps have a mind of their own, like games or Adobe programs. Dig into their settings for tweaks.
- Driver Drama: Outdated mouse software? That’s a no-go. Make sure drivers are fresh.
- Security Freakouts: Antivirus not playing ball with your third-party apps? Give them a free pass in the settings.
And So, Why Bother?
What really matters here is the fluid way it lets you juggle different tasks—comparing documents, coding with logs or terminals in sight, or surfing references without jumping between windows. It’s about reclaiming control over how your input works, making your workflow more streamlined and efficient.
Everyone has their own unique setup, so test these solutions out and always back up your settings. Here’s to a smoother multitasking adventure!
Alright, if you’re looking to make scrolling inactive windows a breeze, it’s pretty simple. Here’s how you can set it up on your Windows machine:
For Windows 10: You wanna start by getting into Settings. Just hit the Start menu and tap on ‘Settings’, or save some time by pressing Windows + I. Once you’re in there, head over to ‘Devices’. Look for ‘Mouse & touchpad’ on the left side and bingo, there it is—turn on ‘Scroll inactive windows when I hover over them.’
Now, if you’re on Windows 11: the setup’s a tad different. Again, you’ll kick things off with the Start menu and ‘Settings’. When you’re in, go to ‘Bluetooth & devices’. Then click on ‘Mouse’. You should see the same option, ‘Scroll inactive windows when I hover over them.’ Flip the switch, and you should be all set.
Ran into a snag? Here’s the rundown. First, double-check those mouse drivers–they might need an update. Some Windows updates could smooth out any bumps too. And hey, if all else fails, a good ol’ restart never hurt anyone.
Honestly, this trick is a game-changer for juggling loads of open windows without clicking around like crazy. Just follow these steps, and you’ll be scrolling like a pro in no time.