What’s the Best Way to Erase Partitions on a Hard Drive?
What’s the Best Way to Erase Partitions on a Hard Drive?
4 Answers
Deleting a partition permanently erases all data stored on it. Ensure you have backed up critical files before proceeding.
For Windows Systems
DiskPart (Command-Line Tool)
Open Command Prompt as Administrator.
Execute commands:
diskpart → Launch DiskPart.
list disk → Display all disks.
select disk [number] → Replace [number] with the target disk.
list partition → Show partitions on the selected disk.
select partition [number] → Specify the partition to delete.
delete partition override → Force deletion (required for protected/system partitions).
exit → Close DiskPart.
Settings App (GUI)
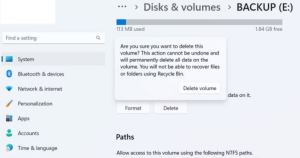
Press Win + I → System → Storage → Advanced storage settings → Disks & volumes.Select the target drive → Properties → Delete → Delete volume.Confirm to erase the partition and all data.
For macOS Systems
Using Disk Utility
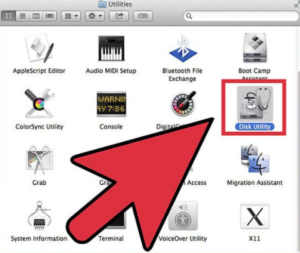
Back up data before proceeding.Open Disk Utility (via Finder search or Applications/Utilities).
Select the disk containing the target partition → Click Partition (top toolbar).
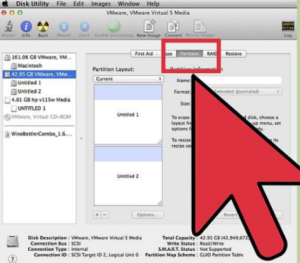
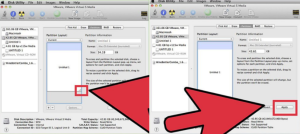
In the partition map:Select the partition (highlighted in blue).Click the − (minus) icon → Confirm Remove.Resize the main partition:Drag the corner handles to absorb freed space.Click Apply → Partition to finalize.Note: Reformatting may take time depending on data size.
Key Notes
Backup First: Always secure data before partition operations.
Protected Partitions: On Windows, use delete partition override for system-related volumes.
Alternatives: Third-party tools like AOMEI Partition Assistant or MiniTool offer simplified workflows if native methods fail.
If you’re looking to wipe out partitions on your hard drive, you’ve got a few tricks up your sleeve. You can go down the path of Disk Management, Command Prompt with DiskPart, or PowerShell. Here’s a rundown of how you can do it.
- Get Disk Management Running:
- Give the Start button a right-click and choose ‘Disk Management’ from the options. Easy peasy.
- Find the Partition You Want Gone:
- Once in the Disk Management window, hunt down the partition you want to erase. Right-click it like you mean business.
- Slam the Delete Volume Button:
- Click ‘Delete Volume’ from the menu that pops up.
- When it asks if you’re sure, say yes. All data on that partition will be history, turning it into a stretch of unallocated space.
- Do Something with That Space (Optional):
- If you’re in the mood, extend another partition into this free space or carve out a fresh one.
- Run Command Prompt as the Big Boss:
- Type ‘cmd’ in start, right-click Command Prompt, and pick ‘Run as administrator’.
- Fire up DiskPart:
- Hammer ‘diskpart’ and hit Enter to wake up the DiskPart utility.
- Show Me the Disks:
- ‘list disk’ then Enter will show all the disks connected. This is your starting line.
- Choose Your Disk:
- Pick the disk with the partition you’re moving on from (say, Disk 1). ‘select disk [number]’, swapping
[number]with your disk, then hit Enter.
- Pick the disk with the partition you’re moving on from (say, Disk 1). ‘select disk [number]’, swapping
- Show All Partitions:
- Press ‘list partition’ and Enter to lay out every partition on your chosen disk.
- Highlight the Partition You Want Gone:
- Find the partition you can do without (e.g., Partition 1). ‘select partition [number]’, chucking
[number]in for your partition number, and blast Enter.
- Find the partition you can do without (e.g., Partition 1). ‘select partition [number]’, chucking
- Blow Away the Partition:
- Type ‘delete partition’ and Enter to nix that pesky partition for good.
- Leave DiskPart:
- ‘exit’ to get out, job done.
- Open PowerShell Like a Master:
- Search for ‘PowerShell’ in Start, right-click it, and go for ‘Run as administrator’.
- Grab List of Volumes:
- ‘Get-Volume’ and Enter will give you a rundown of all volumes at your disposal.
- Zap a Volume by Drive Letter:
- Got the drive letter of the volume you wish to kiss goodbye? ‘Remove-Partition -DriveLetter [letter]’, swapping [letter] with your drive letter (like Z), then hit Enter.
- Liquidate a Volume by Partition Number:
- Need to zero in by number instead of letter? Start with ‘Get-Disk’ to pinpoint the disk packing your target volume.
- Next, list partitions with ‘Get-Partition -DiskNumber [number]’, swapping
[number]for your real disk number. - Finally, ‘Remove-Partition -DiskNumber [disk-number] -PartitionNumber [partition-number]’, replacing the placeholders with what fits.
Keep in Mind
- Before pulling the trigger on any partitions, make sure you back up anything important from them. No turning back once you delete.
- Go careful; picking the wrong disk or partition could cause headaches with data loss.
- After you’ve wiped a partition, it turns into unallocated space, ready to be shaped into new partitions or extensions.
These methods are your toolkit, helping you to get your hard drive organized without a hitch. Just keep a close eye on your data and let these steps guide you.
Got a hard drive with a bunch of partitions you want gone? No problem—let me show you how to nuke them into oblivion, whether you’re on Windows or macOS.
So Why Bother Erasing Partitions Anyway?
Partitions are like little compartments on your hard drive that keep things nice and neat. Wiping them out means you’re saying goodbye to all the data and structure within them. You’d do this because:
- You’re looking to shuffle around your storage space.
- You’ve got to sort out some corruption issues.
- Or maybe it’s time to pass the drive on or sell it.
How to Go About It
1. If You’re Rolling with Windows
a. Disk Management—Your Built-in Buddy
- Step 1: Hit up the Start menu, right-click, and dive into Disk Management.
- Step 2: Find the drive or partition you’re looking to zap.
- Step 3: Right-click each partition and select Delete Volume.
- Step 4: Keep at it until they’re all history. You should end up with “Unallocated” space.
b. DiskPart’s Like the Swiss Army Knife
- Step 1: Fire up Command Prompt as the big boss (admin) and enter
diskpart. - Step 2: Now, throw this command in:
list disk select disk [number] clean c. Need Backup? Third-Party Tools to the Rescue
You’ve got some solid options like AOMEI Partition Assistant or EaseUS Partition Master if the native tools just aren’t cutting it for tricky situations.
2. Mac Users, You Haven’t Been Forgotten
a. Disk Utility—the Household Favorite
- Step 1: Cruise into Disk Utility through Applications → Utilities.
- Step 2: Target the drive itself in the sidebar—not just a volume.
- Step 3: Hit that Erase button and pick your poison, format-wise (like APFS, exFAT).
- Heads Up: Wiping the whole drive means bye-bye partitions.
b. Terminal—When You’re Feeling Hardcore
- Step 1: Open Terminal and go with the flow using
diskutil listto ID the drive. - Step 2: Type in
diskutil eraseDisk [format] [name] [disk identifier].
For Example:
diskutil eraseDisk JHFS+ NewDrive disk2 Curious Things That Can Mess Up Your Day
1. If Partitions Won’t Budge
- Why?: Could be a system or recovery partition that’s still got one foot in the water.
- What You Can Do:
- Windows folks: Boot from a recovery drive and take charge with DiskPart.
- Mac fans: Hammer away in Recovery Mode ⌘ + R and launch Disk Utility.
2. Gray Erase Button Spoiling the Fun on macOS
- Culprit: Locked, damaged, or holding a core system volume hostage.
- Solution:
- Double-check that the drive isn’t your startup disk.
- If that fails, flex those Terminal commands to force the erase.
3. Freaking Out About Data Loss?
- Reason: Accidentally wiping out the wrong segment can be scary.
- Your Lifeline:
- Before going postal, rescue software works wonders (like Wondershare Recoverit) to bail you out.
Handy Tips to Keep in Mind
- Backup, Backup, Backup: Before unleashing your inner Hulk on those partitions, save your stuff.
- Double-Check Everything: Seriously, eyeball the drive/partition before making any moves.
- Don’t Mix Oil with Water: Go for exFAT formats if you need the drive to play nice with different operating systems.
Erase safely and avoid the usual hiccups like losing stuff you really need. And hey, if you’ve got persistent issues, those third-party tools can be heroes in disguise.
If you want to clear out some space or start fresh with your hard drive, wiping out those partitions is a great way to go. Let’s dive into how you can do it on Windows, macOS, and Linux.
Windows Tricks:
First up, Disk Management:
- Hit
Win + Xand go for Disk Management. - Spot the partition you want to toss and right-click on it.
- Select Delete Volume.
- Smash the confirm button when it asks. You’ll end up with “Unallocated” space.
Then there’s Diskpart:
- Press
Win + R, typecmd, and smash Enter. - Once you’re in Command Prompt, type
diskpartand hit Enter. - Type
list diskto see what disks are hanging around and find your target. - Type
select disk X(use your disk number in place of X). - Type
list partitionto eyeball the partitions on your disk. - Select the partition by typing
select partition Y(swap Y with your partition number). - Type
delete partitionand hit Enter.
Mac Magic:
With Disk Utility:
- Go to Disk Utility from Applications > Utilities.
- Find the disk that’s holding the partition you want gone.
- Pick the partition and highlight it.
- Hit the Delete button (–) up top.
- Confirm and hit Apply.
Linux Way:
GParted to the rescue:
- Fire up GParted (install it with
sudo apt-get install gpartedif it’s missing). - Choose the right disk from the dropdown menu.
- Right-click the partition you’re done with and select Delete.
- Hit Apply All Operations up top.
- Do the deed when it asks for confirmation.
Command Line for the win:
- Open up that terminal window.
- Type
sudo fdisk -lto see all disks and partitions. - Go with
sudo fdisk /dev/sdX(swap X with your disk’s letter). - Press p to list the partitions.
- Use d plus the partition number to nuke it.
- Press w to save and quit.
Knocking out partitions across different systems is totally doable if you follow these steps, but do yourself a favor and back up important stuff first. This will wipe all data on the partitions, so make sure you’ve got your best stuff safe somewhere else.