How Can I Enable Kernel Extensions on My Mac?
How Can I Enable Kernel Extensions on My Mac?
5 Answers

While macOS generally prioritizes security by restricting kernel extensions, you may occasionally need to enable them for specific hardware or software. Exercise extreme caution: kernel extensions run at the deepest level of the system and pose significant security risks if compromised. Only authorize extensions from developers you explicitly trust. Follow these steps:
Boot into Recovery Mode:
Shut down your Mac completely.
Press and hold the power button (or Touch ID button) until you see the “Loading startup options” screen appear.
Select “Options” and click “Continue”.
Choose your administrator account, enter its password, and press “Continue” to enter macOS Recovery.
Reduce Security Settings & Allow Kernel Extensions:
From the macOS Utilities menu in Recovery, select Utilities > Startup Security Utility.
Select your Mac’s startup disk.
Click the Security Policy button.
Choose the “Reduced Security” option.
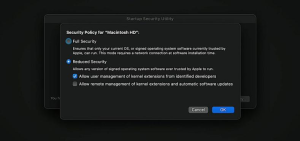
Crucially, check the box labeled “Allow user management of kernel extensions from identified developers”.
Click OK.
Enter your administrator password when prompted and click Continue to apply the changes.
Restart your Mac normally by selecting Apple menu > Restart.
Authorize Specific Extensions in macOS:
After your Mac fully boots back into macOS, attempt to install or run the kernel extension that requires it (this might involve installing associated software, connecting hardware, or running a specific command).
System Alert: macOS will detect the request and typically display a system alert prompting you to authorize the specific kernel extension.
System Preferences/Settings: If the alert appears, follow its instructions. Otherwise, or if further authorization is needed:
Go to System Settings (or System Preferences on older macOS versions) > Privacy & Security.
Look for a message in the General section at the bottom (sometimes near the top shortly after boot) related to allowing “System software” or specifying the extension’s name. Click Allow or Details… to approve it.
Restart: Some extensions mandate a final restart after authorization before they become fully active. Comply with any on-screen prompts.
Enabling kernel extensions lowers a core security barrier. Only proceed if absolutely necessary, and meticulously verify the source and trustworthiness of every extension you authorize. Apple strongly encourages developers to use the more secure System Extensions framework introduced in macOS Catalina (10.15) and later.
So, you’re trying to get some kernel extensions (kexts) up and running on your Mac. These little bits of code are essential for some hardware and software to function properly, but Apple’s got some serious security measures, especially on their newer Apple Silicon Macs. Here’s how you can enable them:
Before You Dive In
- Check Your macOS Version: Not all versions of macOS support kernel extensions, so make sure your OS is compatible.
- Backup Your Data: Better safe than sorry. Enabling kexts can sometimes mess with system stability, so back up your data to avoid any nasty surprises.
- Verify Compatibility: Some older kexts might not work with the newer Apple Silicon Macs. Double-check that everything’s all good.
- Admin Privileges: You need admin rights for this task.
Enabling Kernel Extensions on Apple Silicon Macs
Using System Preferences:
- After installing software that requires kexts, find and click “Open Security Preferences” in the “System Extension Blocked” notification.
- Go to the “Privacy & Security” window and select “App Store and identified developers” under “Allow applications downloaded from.”
- Hit the “Enable System Extensions” button and enter your admin password.
- When prompted, shut down your Mac to adjust security settings in Recovery Mode.
- Hold the power button to enter “Loading startup options.” Click “Options,” then “Continue” to enter Recovery Mode.
- In Recovery Mode, go to “Utilities” > “Startup Security Utility.” Select “Reduced Security” and check the “Allow user management of kernel extensions from identified developers” box. Click “OK,” enter your admin password, and restart your Mac.
- After restarting, head back to System Settings > Privacy & Security, scroll to the Security section, and click “Allow” next to the blocked software message. Enter your admin password and restart your Mac.
Using Command Line:
- Open Terminal (found in Applications > Utilities).
- Enter
kextstatto see loaded kernel extensions and note the bundle identifier of the one you need. - Enter
sudo kextload -b com.bundle.identifier.extension, swapping in your specific bundle identifier. Enter your admin password. - Restart your Mac to activate changes.
Enabling Kernel Extensions on Intel-Based Macs
On macOS Catalina and Earlier:
- Download and install the kext package.
- Restart your Mac and hold “Command + R” to enter Recovery Mode.
- Open “Terminal” from the Utilities menu.
- Type
spctl kext-consent add com.identifier.kext, replacing with your kext’s bundle identifier. Enter your admin password and press “Return.” - Restart your Mac to finish installation.
On macOS Big Sur and Later:
- After installing the necessary software, click “Open Security Preferences” in the “System Extension Blocked” notification.
- Unlock settings by clicking the lock icon in the “Security” section and entering your admin password.
- Click “Enable System Extensions” and follow on-screen instructions to restart into Recovery Mode.
- In Recovery Mode, open “Startup Security Utility,” select “Reduced Security,” and check “Allow user management of kernel extensions from identified developers.” Enter your admin password and restart your Mac.
- Once back on your desktop, go to System Preferences > Security & Privacy, and approve the blocked software by clicking “Allow.”
Post-Enablement Tasks & Troubleshooting
After enabling a kext, a restart is usually necessary to load it and rebuild the auxiliary kext collection. Some apps might need additional setup. If you face issues like the kext not loading or software conflicts, ensure compatibility with your macOS version and hardware. Reinstallation or updates might help, and consulting software support may be necessary for persistent problems.
Security Stuff
Remember, kexts have direct access to your Mac’s kernel, so they can potentially compromise system stability and security. Only trust kexts from reputable developers. It’s a good idea to revert your security settings back to normal once you’re done.
Enabling these extensions isn’t the hardest thing, but it definitely requires some careful steps. Make sure you’re thorough to keep your system running smoothly!
Alright, folks, let’s dive into the whole deal of enabling kernel extensions on your Mac. If you’re rocking one of those snazzy new Macs with Apple silicon, you’ll definitely need to shimmy through a few hoops thanks to Apple’s beefed-up security. No worries though, I’ve got your back with some steps to breeze through this.
First up, a quick word on kernel extensions, a.k.a kexts. They’re like these nifty sidekicks for macOS, helping it do more cool stuff. But Apple’s been tightening the reins since Big Sur, so it’s kinda like talking your way into a club—possible, but proceed with caution and only if you really, really need to.
Now, before you get rolling, make sure you’ve got that golden ticket of administrator access. Also, if you’re wondering whether your Mac’s got beef like Arnold in the 80s (meaning: made with Apple silicon), check that out since the steps differ from older Intel-based Macs.
Let’s get into it:
- Hit the Brakes: First, shut down your Mac. Yeah, just hit “Shut Down” from the Apple menu.
- Hold Your Horses: As you fire it back up, keep your finger on the power button until you spot “Loading startup options.” Let go at that point.
- Choose Wisely: Pick “Options” and click “Continue.” You might have to toss in your admin credentials here.
Once you’re in Recovery mode:
- Up the Elevator: Navigate the “Utilities” in the menu bar.
- Security Briefing: Choose “Startup Security Utility” to make friends with your Mac’s security settings.
Here comes the tricky part:
- Pick Your Poison: In the Startup Security Utility window, select that trusty “Macintosh HD” or whatever name you lovingly gave your hard drive.
- Loosen the Leash:
- Click on “Security Policy.”
- Go for “Reduced Security.”
- Tick the box allowing user management of kernel extensions from verified developers.
- Seal the Deal: Click “OK” to lock it in.
After the serious business:
- Tap “Restart” from the Apple menu to launch back into your usual Mac activities.
Now, your Mac’s back, and it’s time to handle any extension nags:
- If a stubborn system extension plays hard to get, don’t sweat it.
- Head over to System Settings or Preferences, whichever your macOS prefers.
- Wander into Privacy & Security, and give that “Allow” button a loving tap next to the blocked software message.
A few things to keep in mind: you’ll only need to ride the Recovery mode train once per device. After that, most of the backstage work with extensions can be done directly through System Settings. And remember, stick to extensions from developers you’d trust with your grandma’s secret cookie recipe—they can seriously affect your Mac’s mojo.
Follow these steps, and you’ll have those kernel extensions wrangled in no time, and still keep a watchful eye on the security side of things.
Getting Kernel Extensions Running on Your Mac
Kernel extensions on macOS let you dive into some serious hardware and system-level fun, but Apple tightened the reins on these due to security concerns. These days, especially on those slick new Apple Silicon Macs, you’ll need to jump through a few hoops to get them rolling. Let’s take a walk through what you need to do.
What’s the Deal with Kernel Extensions?
Think of kernel extensions as the old-school way to let software play nice with macOS’s core—its kernel. While Apple would prefer you use system extensions since they got the security seal of approval, some older gear and software still need those kernel extensions to get by. To bring back those extensions, you’ll have to mess with macOS’s security settings, depending on whether you’re rocking an Intel-based Mac or one of those shiny new Apple Silicon models.
Why Won’t My Kernel Extension Work?
- Security Headaches: macOS just doesn’t trust unsigned extensions—it blocks them automatically.
- Software Past Its Prime: Old software might not be hooking up correctly with newer macOS builds.
- Apple Silicon Time: The M series Macs need extra approving because, well, Apple decided they should.
- System Integrity Protection (SIP): SIP is like your computer’s security blanket, stopping changes in critical spots.
How to Get Those Kernel Extensions Approved
Step 1: Kick Things Off (It’s the Same for Both Mac Worlds)
- macOS 10.15 or Later:
- Pop into System Preferences → Security & Privacy → General.
- Unlock it with the padlock icon (yes, you’ll need your password).
- If there’s a pop-up asking to approve a kernel extension, just hit Allow.
- Give your Mac a reboot to sort things out.
- If You Don’t See Any Pop-up:
- Peek at your software’s documentation—you might find some steps there to authorize manually.
- Double check that the extension’s got its signing done from someone you trust.
Step 2: Working Through Apple Silicon’s Recovery Mode
Alright, so the newer Macs are a bit more involved. You’ve got to hit up Recovery Mode to tweak security:
- Hop into Recovery Mode:
- First, shut down your Mac.
- Hold that power button till “Loading startup options” does its thing.
- Select Options → Continue for Recovery Mode.
- Adjust Security Policy:
- Go to Utilities → Terminal in the menu bar.
- Enter:
bputil -- kextThis command loosens the reins on kernel extension restrictions for a bit. - Reboot your Mac.
- Do the After-Reboot Approval Dance:
- Head over to System Preferences → Security & Privacy → General.
- Give the kernel extension the thumbs up under the “Allowed” section.
Step 3: Maybe Switch Off System Integrity Protection (SIP)
Still facing a brick wall? SIP could be the stubborn one:
- Hop back into Recovery Mode.
- Open Terminal and use the command:
csrutil disable - Reboot your Mac.
- Caution: Turning off SIP can leave your system at risk from baddies—so try to re-enable it afterward with
csrutil enable.
- Caution: Turning off SIP can leave your system at risk from baddies—so try to re-enable it afterward with
Step 4: Dealing with Extensions That Need an Update or Are Just Being Difficult
- Check If It’s Compatible:
- Ensure the extension jibes with your macOS version.
- Reach out to the developer if there’s an update on the horizon.
- Scratch Out Extensions Causing a Fuss:
- Look in
/Library/Extensionsor/System/Library/Extensions. - Zap corrupted or rogue extensions using
sudo rm -rfin Terminal. - Rebuild that kernel cache for good measure:
sudo kextcache -i /
Troubleshooting Missteps You Might Face
- “System Extensions Blocked” Message:
- No worries! Just follow those Apple Silicon steps again from the Recovery Mode bit.
- CPU is Going Haywire with
kernel_task: - A busted extension could be the sneaky culprit. Try limiting CPU usage with
cputhrottlewhile you hunt down the issue. - USB Accessories Not Playing Along:
- If USB devices have gone rogue, unplug ‘em and reset the System Management Controller (SMC).
Keeping Things Secure
- Use kernel extensions when you’ve got no other choice.
- Swing towards system extensions or upgraded software that checks all of Apple’s security boxes.
- Take a peek at your installed extensions regularly to dodge any risk.
Once you nail down these steps, you’re good to go with kernel extensions while still keeping your Mac secure. Keeping your macOS and all your software up to snuff means fewer compatibility woes down the lane.
Hey there! Want to enable kernel extensions on your Mac? Let’s dive in and figure this out together.
First up, you gotta get your Mac into Recovery Mode. Here’s the deal: Shut down your Mac completely. Now, depending on what kind of chip you have, things will be a little different. For those with the Apple Silicon (M1, M1 Pro, M1 Max), press and hold that power button until you spot the startup options window, then jump on ‘Options’ and hit ‘Continue.’ If you’re rocking an Intel-based Mac, turn it on, and immediately slam that Command (⌘)-R combo till the Apple logo or a spinning globe shows up. It’s like magic!
Once you’re in Recovery Mode, it’s time to play with some security settings. Pick your user account and punch in your password. Cruise over to the menu bar, find ‘Utilities,’ and drop into ‘Startup Security Utility.’ Now, select your startup disk and click on ‘Security Policy.’ You’re gonna wanna go with ‘Reduced Security,’ and make sure to tick ‘Allow user management of kernel extensions from identified developers.’ Hit ‘OK,’ and you’re golden.
Time to reboot the old machine to let those settings kick in. Once you’re back up and running, it’s time for the exciting part—installing the kernel extension. Grab it from the identified developer, open up the downloaded file, and roll through the installation instructions. You’ll get a little nudge saying a system extension needs your approval.
Next stop: approving the kernel extension. Pop open ‘System Preferences’ and head straight to ‘Security & Privacy.’ Check out the ‘General’ tab where there’ll be a note about a blocked extension. Drop a click on ‘Allow,’ and if your Mac asks for a reboot, go ahead and do it. This finalizes the setup.
If you’re feeling extra nerdy, you can verify the installation. Open up ‘Terminal,’ type in kextstat, and bounce back on ‘Enter.’ You’ll see all the loaded kernel extensions listed out. See yours there? You’re all set!
And there you have it—follow these steps, and you’ll be running kernel extensions like a pro. Peace out!